![]()
![]()
![]()
![]()
![]()
UNIX Unleashed, Internet Edition
![]()
![]()
![]()
![]()
![]()
by Susan Peppard and David B. Horvath, CCP
If you frequently use macros, sooner or later you will want to write one. Sometimes you catch a mild case of the disease: You create a document with one macro package, but you want paragraphs with a first-line indent and no extra space between paragraphs. Occasionally, you want to do something more elaborate--like creating a macro package for formatting a screen play that you are writing.
Before you start, make sure you are familiar with the building blocks. troff provides you with the following: troff primitives (discussed in detail in Chapter 8, "Basic Formatting with troff/nroff"); escape sequences, such as \e and \^ (also discussed in detail in Chapter 8); other macros (from a standard macro package); number registers; and defined strings.
This chapter will show you:
With embedded troff primitives, you can format a page just about any way you want. The trouble is you have to specify exactly what you want every time you write a new document. And every time you format a first-level heading, you have to remember just what sequence of primitives you used to produce that centered 14-point Helvetica Bold heading. Then you have to type three or four troff requests, the heading itself, and another three or four requests to return to your normal body style. It is a laborious process and one that makes it difficult--perhaps impossible--to maintain consistency over a set of documents.
The good news is you can use macros to simplify formatting and ensure consistency.
Macros take advantage of one of the UNIX system's distinguishing characteristics--the capability to build complex processes from basic (primitive) units. A macro is nothing more than a series of troff requests, specified and named, that perform a special formatting task.
NOTE: The expression troff request is often used as a synonym for troff primitive. In this context, troff request refers to any or all of the facilities provided by troff: primitives, escape sequences, strings, registers, and special characters.
Macros can be simple or complex, short or long, straightforward or cryptic. For example, a new paragraph macro might entail
.sp .5
.ti .5i
This produces spacing of half a line space (nroff) or half an em space (troff) between paragraphs, and indents the first line of each paragraph half an inch.
NOTE: You can use just about any unit of measurement you want--inches, centimeters, points, picas--as long as you specify the units.
Macro names consist of a period followed by one or two characters. Traditionally, these characters are uppercase to distinguish them from primitives. The me package is one exception to this practice. The previously mentioned paragraph macro could be called .P or .PP or .XX.
NOTE: In general, macro names, like primitive names, are mnemonic. There is some relationship, however farfetched, between the macro name and its function. Thus .P or .PP would be reasonable names for a paragraph macro, and .XX would not.
Macros are invoked in a text file by typing their names (with a period in the first position on the line). Macros can also be invoked with an apostrophe (single quote) instead of a period as the first character. This delays processing of the macro until the current line has been filled.
A fairly straightforward example of a macro is that centered heading mentioned earlier. To create it, you need to provide spacing information before and after the heading, font information, size information, and position information (centering).
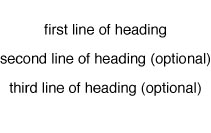
Figure 10.1 shows a troff formatted heading. Listing 10.1 shows the primitives you might use to format headings.
Figure 10.1.
troff formatted heading.
.sp 2    \"space before the heading
.ce 99   \"turns on centering for the next 99 lines
.        \"to accommodate headings that might start
.        \"out as 1 line and then get longer
.ft HB   \"changes the font to Helvetica Bold
.ps 14   \"changes the point size to 14 points
.vs 16   \"changes vertical spacing to 16 points
first line of heading
second line of heading (optional)
third line of heading (optional)
.sp      \"space after the heading
.ce 0    \"turns off centering
.ft      \"returns to default font
.ps      \"returns to default point size
.vs      \"returns to default vertical space
That simple series of troff primitives illustrates several important points.
Most important, it is full of comments. Comments are identified by the sequence \".
You can start the comment at any point on the line. If you want a comment on a line by itself, prefix it with a .. You can put a comment on a line by itself, at the end of a line of troff requests, or at the end of a line of text. You may want to use spaces to line up your comments to make them easier to read.
Another useful technique, illustrated in the previous sample might be called generalization or thinking ahead. Instead of providing for a one-line heading with a simple .ce, which centers the next line of text, the sample code turns centering on by requesting .ce 99 (which centers the next 99 lines of text). Most headings are not much longer than that. After the heading lines are specified, the code turns centering off with a .ce 0.
All of that code could be combined into a single pair of macros, called .HS (for heading start) and .HE (for heading end), so that all you need type is the three commands shown in Listing 10.2.
.HS
first line of heading
second line of heading (optional)
third line of heading (optional)
.HE
This is a big improvement over typing all the commands shown in Listing 10.1, with exactly the same results. The syntax of the .HS and .HE macros is shown in Listing 10.3.
.de HS
.sp 2    \"space before the heading
.ce 99   \"turns on centering for the next 99 lines
.        \"to accommodate headings that might start
.        \"out as 1 line and then get longer
.ft HB   \"changes the font to Helvetica Bold
.ps 14   \"changes the point size to 14 points
.vs 16   \"changes vertical spacing to 16 points
..
.de HE
.sp      \"space after the heading
.ce 0    \"turns off centering
.ft      \"returns to default font
.ps      \"returns to default point size
.vs      \"returns to default vertical space
..
What else might be done with a heading macro like .HS? Most often it would be combined with the .HE macro so that all you must type is:
.H1 "first line of heading"
This is much simpler to use, but a bit more difficult for the macro writer. This would produce the first level of headings and limited to one line of text.
What if the heading came near the bottom of the page? There is nothing in the .HS macro to prevent the heading from printing all by itself just before a page break. You need at least three lines of text after the heading. Fortunately, there is a troff primitive trained for just this job--.ne.
.ne (for need) says "I need the number of lines specified right after me or else I'm going to start a new page." Some word processors and DTP (DeskTop Publishing) software have "Keep with Next" feature that are similar to troff's .ne. How many lines do you need? Three (so there will be at least three lines of text after the heading), plus the heading itself, two more for the spaces before the heading, and one last line for the space after the heading. So a real working version of the sample heading macro might have .ne 7 at the top.
This may seem like a lot of detail; it will get worse. If all you want to do is use a macro package to format documents, you may not want to learn how macros work. But, even if you have no intention of writing a macro yourself, it can be useful to understand how they work. It can save you a lot of time debugging the regular macro packages. The more you know about the way macros are written, the easier it is to format a document.
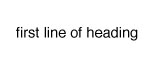
The result of formatting with the .H1 macro is shown in Figure 10.2 with the macro source in Listing 10.4.
Figure 10.2.
troff formatted heading using .H1.
.de H1
.ne 7     \"need 7 lines on page or start new page
.sp 2     \"space down 2 spaces before the heading
.ce 99    \"turn centering on
\f(HB\s+2\\$1\fP\s0
.         \"the font is Helvetica Bold, 2 points larger than
.         \"the body type, the heading itself - $1 -and then return to
.         \"previous font and default point size
.ce 0     \"turn centering off
.sp       \"space down after the heading
..
The .H1 macro allows one argument--the heading text. An argument provides additional information for the macro or primitive--like the 99 specified for the .he primitive. The "Arguments" section later in this chapter goes into more detail.
An argument is coded in a special way. troff recognizes $1 as the first argument following the invocation of the macro (matching the common UNIX convention). There can be up to nine arguments to a single macro (again, a common UNIX convention).
NOTE: Listing 10.4 has a lot of backslashes. Do not worry about them at this point, they are explained in the "Arguments" section.
This macro is beginning to get complicated--it is starting to look like the kind of macro you see in a macro package. In reality, it is doing the same thing as the .HS and .HE macros but in a different way. UNIX is famous for providing many ways to do everything. troff code is no exception.
In the previous example, the font change is accomplished by an escape sequence (\f(HB), instead of the .ft primitive. The point size is accomplished the same way (\s+2 instead of .ps), but note that a relative point size--the current point size plus 2--is specified. Next comes the heading itself, the first argument to .H1, specified as $1.
To return to the previous font, use the escape sequence \fP. In many cases, \f1 works just as well. \f1 returns you to the default body type. To return to your original point size, use \s0 (or \s-2). \s0 returns you to the default point size. Because you do not always know what this is, \s0 can be very useful.
TIP: When you use a heading macro, make a habit of surrounding the heading with quotation marks, even if it is one word long. If you forget the quotes, your heading will be exactly one word long. troff simply disregards the rest of the line.
There is another concept you need to know: conditional execution (if statements). Details on conditional statements can be found later in this chapter in the section, "Conditional Statements." You could use them in the heading macro.
For one thing, you could change the macro name to plain .H and then use an argument to specify the heading level.
.H 1 "first-level heading"
.H 2 "second-level heading"
.
.
.
.H 7 "seventh-level heading"
And this is just what most macro packages do. They provide a general heading macro, and you supply the level and the text for the heading. The generalized macro code would look something like Listing 10.5, with the output for the first two heading levels in Figure 10.3.
Figure 10.3.
troff formatted headings using .H.
.de H
.ne 7     \"need 7 lines on page or start new page
.sp 2     \"space down 2 spaces before the heading
.ce 99    \"turn centering on
.if \\$1=1 \{\   \"if the heading level is 1, do everything within the
.                \"curly braces; otherwise skip everything within them
\f(HB\s+2\\$2\fP\s0
.         \"the font is Helvetica Bold, 2 points larger than
.         \"the body type, the heading itself - $2 -and then return to
.         \"previous font and default point size
\}
.if \\$1=2 \{\   \"Second Level Heading
\fB\s+1\\$2\fP\s0
.         \"the font is Bold, 1 points larger than
.         \"the body type, the heading itself - $2 -and then return to
.         \"previous font and default point size
\}
.if \\$1=3 \{\   \"Third Level Heading
.
.
.
\}
.               \"The remaining conditions go here Followed by:
.ce 0     \"turn centering off
.sp       \"space down after the heading
..
The .if statement is explained in the "Conditional Statements" section of this chapter.
To define a macro, you use the .de primitive and end the definition with two periods. A macro to indent the first line of a paragraph could be defined like this:
.dePX     \"macro to create indented paragraphs, no space between
.ti 3P
..
This is a very simple example. A "real" paragraph macro would check to make sure there was room for two or three lines and, if not, go to the next page. Nevertheless, this simple definition illustrates some important points. The macro name can consist of one or two characters. If you use a name that is already assigned to a macro, the definition in your text file overrides the definition in a macro package. The macro name follows the .de. It can be separated from the .de by a space, but a space is not necessary.
TIP: Although the space following the .de does not matter, consistency does. Someday, you will want to list and sort your macro definitions, and you cannot sort them as easily unless you can rely on a space (or no space) between the .de and the macro name.
A macro definition can include troff primitives and other macros. A brief description of the macro is included on the definition line. This is crucial. You can forget more about macros in two weeks than you can learn in two years. Comment lavishly. And make sure you include a comment on the definition line to identify the macro. This helps when you search for macro definitions (using grep) and then sort them.
There is one more constraint on macro names: A macro cannot have the same name as a defined string. Although macros can share names with number registers, it is a bad practice to do so.
NOTE: There is no law against giving a macro the same name as a primitive. In fact, it sounds like an excellent April Fool's joke. If you should be foolish enough to try this, bear in mind that the primitive will, for all intents and purposes, cease to exist. All that will remain will be your macro, so make it a good one.
If, instead of defining a new macro, you want to redefine an existing one, then you use the existing macro's name:
.deP
.ti 3P
..
If you redefine the .P macro, the old definition is no longer used (although it is still there in the mm macro package). To return to the old definition, you must get rid of your new definition (delete it from the top of your file or delete the file containing the definition).
The benefit to writing a new macro with a new name is that the old definition is still usable. The drawback is that you are used to typing .P, so you will probably forget to type .PX when you want to use your new macro.
To define a macro, use .de. You can end the definition, as shown previously, with .., or you can use the delimiters of your choice, like this:
.deP!!
.ti 3P
!!
This allows you to have macros that include the characters ...
Once you have written your macro definition, you can add it to an existing macro package, add it to your own file of new macros, and source the file into your text files with .so, or just put the macro definition in your text file.
TIP: Creating an add-on file of macros is the least desirable way of incorporating your macros. If your current macro package needs that much help, someone should rewrite the package. The purpose of a macro package is to ensure a consistent look to documents prepared with the package. If everyone defines their own set of paragraph macros, this purpose is defeated.
Number registers are locations that store values. They store whole numbers that often have units attached to them. The numbers are often represented as characters (see the .af troff request). There are three things you can do with a number register:
Number registers are used very frequently in macro definitions. They contain such information as line length, page offset, current font number, previous font number, current indent, current list item number, and so on.
For example, if you are formatting an automatic list (with mm), you would find the following information in number registers: current indent; current nesting level (that is, is the list a list-within-a-list?); item number; format of item number (that is, Arabic, uppercase roman numeral, lowercase Roman numeral, uppercase alphabetic, or lowercase alphabetic).
Every time troff processes a .LI, the number registers that control these characteristics are interpolated. Some of them (the list item number, for example) are also incremented.
This information can be useful if you are formatting what I call a "discontinuous list" (a list that has ordinary text between two of the list items).
Before you insert the ordinary text, you must end the current list. When you want to continue the list, another .AL and .LI will start the list at 1. However, you want it to start at 5. If you know which number register stores this information, you can reset it.
To set a number register:
.nr a 0
.nr aa 0
.nr AA 1i
.nr b +1i
The units are optional and very tricky. No matter which unit of measurement (called a scaling factor) you specify with a number register, the value is stored in troff units (u) which is based on the resolution of the output device. For a 300dpi device, 1i (one inch) is stored as 300u. When you add 1 to the register, you are adding 1 troff unit--unless you specify units. Note the following:
.nr x 2i    \"has a value of 600u
.nr x +1    \"now has a value of 601u

.nr x 2i    \"has a value of 600u
.nr x +1i   \"now has a value of 900u
Units of Measurement
troff allows you to use many different units:I inch p point u troff unit
c centimeter m em v vertical line space
P Pica n en
Unfortunately, it is impossible to be 100 percent certain of the default units for any given primitive. For the most part, the troff default for horizontal measurements is the em and for vertical measurements is the vertical line space. The nroff default for horizontal measurement is device-dependent, but it is usually 1/10 or 1/12 of an inch.
If you use arithmetic expressions, you will soon find that none of those defaults work the way they are supposed to. The culprit is the troff unit (u). A troff unit is about 1/300 of an inch (for a 300 dpi printer). Because this is a very much smaller unit than any of the others troff accepts, you can expect loony output from time to time. Your text will print, but the way you expect it.
Always specify units.
If you want to divide 37 inches by 2, you are far safer doing the arithmetic in your head and specifying 18.5P than letting troff decide how to process 37P/2. troff will not do what you expect. troff will divide 37 picas by 2 ems. You will not like the result. If, in desperation, you try 37/2P, you will still not like the result because troff will divide 37 ems by 2 picas. You have to specify 37P/2u. The u acts as a sort of pacifier and lets troff perform the arithmetic correctly.
When you are unsure of the units, use troff units. It is similar to adding backslashes. A few more will probably fix the problem.
You also have the option of specifying the increment/decrement to the register when you define it:
.nr b 10 1
.nr bb 0 2
Note that you do not specify whether 1 (in the first instance) or 2 (in the second instance) is to be an increment or a decrement. That is done when you interpolate the register.
To interpolate the contents of a number register:
\\na       \"one-character name
\\n(aa     \"two-character name
\\n+b      \"increments register b
\\n-(bb    \"decrements register bb
Number registers contain numbers. They are often used in arithmetic expressions:
.if \\na<1
.if \\na=\\nb
.if \\na+\\nb<\\nc
There is another arithmetic expression, common in troff, that looks unfinished:
.if \\na         \"if a is greater than 0
.if \\na-\\nb    \"if a minus b is greater than 0
.if !\\na        \"if a is not greater than 0
To increment or decrement a number register, use
.nr a \\na+1
.nr a \\na-1
Note that you do not use an equal sign when you set a register.
You can define a number register in terms of another number register (or two):
.nr z (\\nx+\\ny)
Further on in this section there are two tables of number registers predefined by troff. You will not want to use those names for your own number registers. If you are working with any macro package, you must ensure that the number registers used by your macro package do not match those already defined. You do not want to overwrite the contents of the number register that numbers lists or stores indents; your document will not look right!
Using Number Registers for Automatic Numbering
Every now and then you work on a document that cries out for automatic numbering. One example that comes to mind are storyboards for training materials. Each "board" represents a screen (in computer-based tutorials) or a viewgraph (in ordinary courses). Each board consists of graphics, text, and possibly animation or sound instructions.I have found that you need to number the boards, both for your own convenience and to make things simple for your reviewers. Unfortunately, the order of the boards changes with frequency.
If you explicitly number the boards, you have to explicitly change the numbers every time you switch 7 and 8 or 30 and 54. This is not a fun and efficient way to spend your time.
You can use number registers to provide automatic numbers for the boards. You could also write a program to do so, but, that is not an efficient solution either.
To use number registers for automatic numbering, do the following:
You can do this even more elegantly by defining an autoincrementing/decrementing number register:
.nr vv 0 1The initial value in vv is 0; the autoincrement/decrement is 1. At this point, troff does not know whether you want the register contents to be incremented or decremented. You specify that when you interpolate the register.
\n+(vv(The plus sign tells troff to increment the register.)
You can refine this to include a unit number, giving you compound folios, but this is practical only if you are using a macro package with chapter numbers (or some similar device like section or unit numbers) and you are using these numbers in your files.
Assuming you are using chapter numbers and the register for chapter numbers is cn, you can specify your board numbers like this:
.\n(cn-\n+(vvIf your chapter numbers are stored in a string called cn, do this:
\*(cn-\n+(vvThere is one disadvantage to using automatic numbering in this way. It is the same disadvantage you may have experienced with mm's automatic lists. When you look at your file, you have no idea what your current step (or board) is. And, if you have to refer to a previous step or board, you probably end up writing "Repeat Steps 1 through ???," printing your file, and inserting the correct numbers later.
Sometimes you need to remove registers. This is especially necessary if your macros use a large number of registers. It is a good idea to get into the habit of removing temporary registers as soon as you are done with them. To remove a register, use the .rr primitive:
.rr a \"remove register a
Table 10.1 lists the number registers that are predefined by troff. You can change the contents of these registers, but, whatever you do, do not use these names for your own number registers.
| Register Name | Description |
| % | current page number |
| ct | character type (set by \w) |
| dl | (maximum) width of last completed |
| dn | height (vertical size) of last completed diversion |
| dw | current day of the week (1-7) |
| dy | current day of the month (1-31) |
| ln | output line number |
| mo | current month (1-12) |
| nl | vertical position of last printed baseline |
| sb | depth of string below baseline (generated by \w) |
| st | height of string above baseline (generated by \w) |
| yr | last 2 digits of current year |
Table 10.2 lists the read-only number registers that are predefined by troff. You cannot change the contents of these registers, but you can inspect them and use their contents in condition statements and arithmetic expressions.
| Register Name | Description |
| .$ | number of arguments available at the current macro level |
| .$$ | process id of troff or nroff |
| .a | post-line extra line-space most recently used in \x'N' |
| .A | set to 1 in troff if -a option used; always 1 in nroff |
| .b | emboldening level |
| .c | number of lines read from current input file |
| .d | current vertical place in current diversion; equal to n1 if no diversion |
| .f | current font number |
| .F | current input filename |
| .h | text baseline high-water mark on current page or diversion |
| .H | available horizontal resolution in basic (troff) units |
| .I | current indent |
| .j | current ad mode |
| .k | current output horizontal position |
| .l | current line length |
| .L | current ls value |
| .n | length of text portion on previous output line |
| .o | current page offset |
| .p | current page length |
| .R | number of unused number registers |
| .T | set to 1 in nroff, if -T option used; always 0 in troff |
| .s | current point size |
| .t | distance to the next trap |
| .u | equal to 1 in fill mode and 0 in no-fill mode |
| .v | current vertical line spacing |
| .V | available vertical resolution in basic (troff) units |
| .w | width of previous character |
| .x | reserved version-dependent register |
| .y | reserved version-dependent register |
| .z | name of current diversion |
A defined string is a set of characters to which you assign a name. The string is always treated as a literal, and you cannot perform any arithmetic operation on it. You can, however, compare it to another string, or even compare the string "2" to the contents of a number register.
A string definition looks a lot like a macro definition:
.ds name value
.ds name "value that has a lot of separate words in it
.dsU U\s-1NIX\s0
.dsUU "UNIX Unleashed
String names consist of one or two characters. The names come from the same pool as macro names, so be careful to choose a unique name for your string. In the previous examples, note that the .ds can, but does not have to be, followed by a space. Note also that you use only the opening quotation marks when your string consists of multiple words. If you do include a closing quotation mark, it will be printed as part of the string.
To invoke the string:
\\*a      \"one-character name
\\*(aa    \"two-character name
Sometimes a string is a better choice than a number register. If you are dealing with alphabetic characters, a string may be your only choice.
Consider the following: You want to define something to hold the number of your current chapter. If you use a number register, you can increment these numbers very easily. You will only have to set the value once, at the beginning of the book. Unless you have appendixes. If you have appendixes, you will have to reset to 1 when you reach Appendix A, and then you will also have to translate that number into a letter.
NOTE: To use a number register for chapter numbers, use .af (alter format) to produce uppercase letters for your appendixes. .af recognizes the following formats:
1 Arabic numerals i lowercase roman numerals I uppercase roman numerals a lowercase alphabetic characters A uppercase alphabetic characters To use the letter A in a compound page number (where the number register storing chapter numbers is cn), specify the following: .af cn A.
Perhaps a string would be simpler. You will have to redefine the string at the beginning of each chapter, but you will not have to alter any formats.
Strings can be used as general purpose abbreviations, although this is not their primary purpose, nor even the best use of strings. A better use is to define a string containing the preliminary name of the product you are documenting. Then, when the marketing people finally decide to call their new brainchild "XYZZY Universal Widget," you do not have to do any work to replace the temporary name. You can just redefine the string.
Define a string near the top of your file as the preliminary name of the product:
.ds Pn "Buzzy \"code name for product
Remember that strings and macros cannot have the same name.
When the ugly duckling "Buzzy" becomes the swan "XYZZY Universal Widget," just change the definition:
.ds Pn "XYZZY Universal Widget \"official name for product
Like macros, strings can have information appended. To add to a string, use the troff primitive .as. Although it is hard to imagine a use for this primitive, consider the following: You are documenting three versions of the XYZZY Universal Widget in three separate documents. For the first document, you could add "Version 1.0" to the string:
.as Pn "(Version 1.0)
The other versions can be similarly identified in their documents as "Version 2.0" and "Version 3.0."
Listing Names of Existing Macros, Strings, and Number Registers
If you are using an existing macro package (such as mm or ms) and adding macros to them, you need to know what names (for macros, strings, and number registers) are available and what names have already been used.To create a file called sortmac containing the macro names used in mm (assuming mm is stored in the normal place, /usr/lib/tmac/tmac.m):
grep "^\.de" /usr/lib/tmac/tmac.m | sort | uniq > sortmacAssuming that you are executing this command in the same directory you want the resulting file, sortmac, stored.
Strings are listed pretty much the same way:
grep "^\.ds" /usr/lib/tmac/tmac.m | sort | uniq > sortstrTo list number registers defined in the mm macro package, execute the following sed script in the directory with the macros (/usr/lib/tmac):
sed -n -e 's/.*.nr *\(..\).*/\1/p' tmac.m | sort |uniq > $HOME/sortnumThe standard macro packages should all be in /usr/lib/tmac. The macro filenames are as follows:
tmac.m mm macros tmac.s ms macros tmac.e me macros tmac.an man macros You may find some or all of these packages. You may even find others that your installation has installed. Some implementations (like Solaris) put the macro files in the /usr/lib/tmac directory with names like m, s, e, and an (leaving off the tmac. prefix). Some implementations place their files in other directories.
Remember that troff and nroff--and each macro package--use predefined number registers, and these may not be set within the package.
In addition to defining new macros and redefining existing macros, you can remove, rename, and add material to the end of an existing macro.
To remove a macro, use the .rm primitive:
.rmP
Again, the space between the .rm and the macro name is optional.
This is not something that you do on a whim. Removing a macro requires serious consideration. You might do it if you were experimenting with a better version of an existing macro--a list end macro (.LE) that left the right amount of space after it, for example. Your new, improved macro might be called .lE or .Le. You could encourage people to use your new macro by removing .LE. This may be unwise, because you always forget to tell your local V.I.P. who decided to work on a crucial document on the weekend. A safer way to use your new .Le might be to substitute the definition of .Le for .LE, after it has been tested and found to be truly superior, but to leave the .LE macro definition in the package and remove it at the end of the macro package file. Another alternative is to comment out the original .LE macro.
Unless you are very knowledgeable about macros and are in charge of maintaining one or more macro packages, you will never remove a macro.
To rename a macro, use the .rn primitive:
.rnP Pp
As usual, the space between the .rn and the macro name is optional. The space between the old name and the new name is not optional.
Renaming a macro is almost as serious as removing it. And it can be a great deal more complicated. For example, you might want to fix the list macro in mm by adding some space after the .LE. You can do this by renaming. Here is what you do:
1. Rename the .LE macro. (.rn LE Le)
2. Define a new .LE.
.deLE     \"This is a new improved version of LE - adds space
.Le
.sp .5
..
3. Invoke .LE as usual.
The new .LE (which is the old .LE plus a half-line space) takes the place of the old .LE.
You might think of using .rn so that you could include the .TH (table column heading) macro in a man file. Remember, .TH is the basic title heading macro used in all man files.
This seems to be a reasonable idea. If this sort of thing interests you, you can think through the process with me.
The first thing to establish are the conditions for each of the .TH macros: When should .TH mean table heading, and when should it mean title?
That question is easy to answer. You want the normal .TH to mean title all the time except following a .TS H. So when do you rename .TH? And which .TH do you rename? And, if you boldly put .rnTH Th in your file, to which .TH does it refer?
Think about that, and you begin to see that maybe .TH is not the ideal candidate for renaming.
To add to a macro definition, use .am:
.amP
.ne 2     \"of course this isn't the right place for this request
..
As with the other macro manipulation primitives, the space after the .am is optional.
Adding to a macro, while not a task for beginners, is a lot more straightforward. .am is often used to collect information for a table of contents. Whenever the file has a .H (of any level, or of specified levels), you want to write that information into a data file that will be processed and turned into a Table of Contents.
Suppose you found yourself in the position of typing a term paper. It is easy enough to double space the paper--just use .ls 2. But, if you are not using ms, you do not have an easy way of handling long quotes (which are supposed to be single spaced and indented from the left and right). What do you have to do every time you type a long quotation?
.in +1i
.ll -2i
.ls 1
And at the end of the quotation, you have to reverse that coding:
.in -1i
.ll +2i
.ls 2
Instead of typing those three lines, you could define a .Qb and a .Qe macro. Those two sets of three lines are the definitions. All you need to add is a .deQb (or .deQe) to start the macro definition and two dots to end it. If you want to refine the definition, you can add some space before and after the quotation and a .ne 2 so you do not get one line of the quotation at the bottom of page five and the other six lines on page six. Listing 10.5 shows these macros.
.deQb
.sp
.ls 1
.ne 2
.in +1i
.ll -2i
..

.deQe
.br
.ls 2
.sp
.ne 2
.in -1i
.ll +2i
..
NOTE: There is no rule that says user-defined macros have to consist of an uppercase character followed by a lowercase character. It just makes things easier when you have guidelines.
troff Copy Modetroff processes each file twice. The first time, called "copy mode," consists of copying without much interpretation. There is some interpretation, however. In copy mode, troff interprets the following immediately: the contents of number registers (\n); strings (\*); and arguments (\$1).
You do not want this to happen. troff will find \ns and \*s and \$1s in your macro package file--before the number register or string or argument has any meaningful contents. Fortunately, troff also interprets \\ as \, so you can "hide" these constructs by preceding them with an extra backslash. \\n copies as \n--which is what you want when the macro using that number register is invoked.
Note, however, that this rule does not apply to number registers invoked in your text file. When you invoke a number register in your text file, you want it interpreted then and there. So you do not use the extra backslash.
This seems simple. In fact, it is simple in theory. In practice, it is a horrible nuisance. A glance at a macro package such as ms or mm will show you triple, even quadruple, backslashes. If you do not enjoy thinking through processes step by painful step, you will not enjoy this aspect of macro writing.
troff does not interpret ordinary escape sequences in copy mode. \h, \&, \d are all safe and do not have to be hidden.
During copy mode, troff eliminates comments following \".
Macros, like other UNIX constructs, can take arguments. You specify an argument every time you type a heading after a .H 1 or a .NH. You specify arguments to primitives, too, like .sp .5 or .in +3P. In a macro definition, arguments are represented by \$1 through \$9. You are limited to nine arguments in a macro.
A couple of examples of arguments are:
.deCo     \"computer output (CW) font
\f(CW\\$1\fP
..

.dePi     \"paragraph indented amount specified by $1
.br
.ne 2
.ti \\$1
..
Note that you must hide the argument (with the extra backslash) in order to survive copy mode.
If you omit an argument, troff treats it as a null argument. In the case of the .Co macro, nothing at all would happen. In the case of the .Pi macro, the paragraph would not be indented. If you specify too many arguments (which would happen if you had .Co Press Enter in your file), troff merrily throws away the extras. You would get "Press" in CW font; "Enter" would disappear. Use double quotation marks (.Co "Press Enter") to hide spaces from troff.
A conditional statement says, "Do this under certain (specified) conditions." It may add, "and under any other conditions, do that." You know the conditional statement as an "if" or an "if-else." The troff versions are .if (if) and .ie (if-else). The troff .if has a different syntax from the shell if, but the principle is the same.
A simple .if is coded like this:
.if condition simple-action

.if condition \{\
complex-action
\}
The backslash-brace combinations delimit the actions to be taken when the condition is true.
The if-else works like this:
.ie condition simple-action
.el simple-action

.ie condition \{\
complex-action
\}
.el \{\
complex-action
\}
You use the conditional statement whenever you want to test for a condition. If this is an even page, then use the even-page footer. If these files are being processed by nroff (as opposed to troff), then make the next few lines bold instead of increasing the point size.
troff has four built-in conditions to test for just those conditions:
| o | current page is odd |
| e | current page is even |
| t | file is being formatted by troff |
| n | file is being formatted by nroff |
The odd-even conditions simplify writing page header and footer macros. You can simply say:
.if o .tl '''%'     \"if odd - page no. on right
.if e .tl '%'''     \"if even - page no. on left
The single quotation marks delimit fields (left, center, and right). Thus, '''%' places the page number on the right side of the page and '%''' places it on the left side.
You could do the same thing with .ie:
.ie o .tl '''%'     \"if odd - page no. on right
.el .tl '%'''       \"else if even - page no. on left
The .if, even when it requires a seemingly endless list of conditions, is easier to use.
You can compare strings, but you use delimiters instead of an equal sign:
.if "\\$1"A"
.if '\\$2'Index'
TIP: The bell character, made by pressing Ctrl+G, is often used as a delimiter because it is not much use in a text file. It looks like ^G in a file, but do not be fooled. This is a non-printing character. Before you print out every macro file on your system, check them for ^Gs. Unless you want to spend a lot of time drawing little bells or printing ^G, try substituting another character for the bell before you print.
In addition to comparing numbers and strings, you can also test for inverse conditions. troff recognizes the exclamation mark (!) as the reverse of an expression, for example:
.if !o        \"same as .if e
.if !\\$1=0   \"if $1 is not equal to 0
.if !"\\$1""  \"test for a null argument
Be careful when you use !. It must precede the expression being reversed. For example, to check for an unequal condition, you must write .if !\\na=\\nb. You cannot write .if \\na!=\\nb.
As you see, conditional statements are often combined with arithmetic expressions. You can also use logical expressions. troff understands all of the following:
| + - * / | plus, minus, multiplied by, divided by |
| % | modulo |
| > < | greater than, less than |
| >= <= | greater than or equal to, less than or equal to |
| = == | equal |
| & | AND |
| : | OR |
Unlike other UNIX programs, troff has no notion of precedence. An expression like \\$1+\\$2*\\$3-\\$4 is evaluated strictly from left to right. Thus, to troff, 2+3*5-10\2 equals 7.5. This is hard to get used to and easy to forget. Always specify units.
Diversions let you store text in a particular location (actually a macro that you define), from which the text can be retrieved when you need it. Diversions are used in the "keep" macros and in footnotes.
The diversion command is .di followed by the name of the macro in which the ensuing text is to be stored. A diversion is ended by .di on a line by itself.
Diverted text is processed (formatted) before it is stored, so when you want to print the stored text, all you have to do is specify the macro name. Because there is virtually no limit either to the number of diversions you can have in a file or to the length of any diversion, you can use diversions to store repeated text.
NOTE: Storing repeated text in a diversion is not always a good idea. You can avoid typing the repeated text just as easily by putting it in a file and reading that file into your text file.
For example, suppose the following text is repeated many, many times in your document:
.AL 1
.LI
Log in as root.
.LI
Invoke the UNIX system administrative menu by
typing \f(CWsysadm\fP and pressing Enter.
.P
The system administrative menu is displayed.
.LI
Select \f(CWEquine Systems\fP by highlighting
the line and pressing Enter.
.P
The Equine Systems menu is displayed
You could store this text in .Em (for Equine Menu) by prefacing it with .diEm and ending it with .di.
Note that your diversion contains an unterminated list. If this is likely to cause problems, add .LE to the diverted text.
To print the Equine Systems text, just put .Em in your file.
In addition to .di, there is a .da (diversion append) primitive that works like .am. .da is used to add text to an existing diversion. It can be used over and over, each time adding more text to the diversion. To completely replace the text in a diversion, just define it again with a .diEm. The .am primitive can be used, like .am, to create Table of Content data.
You can even have a diversion within a diversion. The "inside" diversion can be used on its own, as well.
troff provides several kinds of traps: page traps (.wh and .ch); diversion traps (.dt); and input line traps (.it).
Page traps usually invoke macros. For example, when troff gets near the bottom of a page, the trap that produces the page footer is sprung. A simple illustration of this is the following.
Suppose you wanted to print the current date one inch from the bottom of every page in your document. Use the .wh primitive:
.deDa                   \"define date macro
\\n(mo/\\n(dy/18\\n(yr  \"set date
..
.wh 1i Da               \"set the trap
The order of the arguments is important.
To remove this kind of trap, invoke it with the position, but without the macro name: .wh 1i.
The .ch primitive changes a trap. If you wanted the date an inch from the bottom of the page on page 1 of your document, but an inch and a half from the bottom of the page on all subsequent pages, you could use .ch Da 1.5I, note that the argument order is different.
Diversion traps are set with the .dt primitive, for example:
.dt 1i Xx
This diversion trap, set within the diversion, invokes the .Xx macro when (if) the diversion comes within one inch of the bottom of the page.
Input text traps are set with the .it primitive. This trap is activated after a specified number of lines in your text file.
There is a fourth kind of trap, though it is not usually thought of as a trap. This is the end macro (.em) primitive. .em is activated automatically at the end of your text file. It can be used to print overflow footnotes, Tables of Content, bibliographies, and so on.
The .ev (environment) primitive gives you the ability to switch to a completely new and independent set of parameters, such as line length, point size, font, and so forth. It lets you return to your original set of parameters just as easily. This process is known as environment switching. The concept is used in page headers, for example, where the font and point size are always the same--and always different from the font and point size in the rest of the document.
Three environments are available: ev 0 (the normal, or default, environment); ev 1; and ev 2.
To switch from the normal environment, just enter .ev 1 or .ev 2 on a line by itself and specify the new parameters. These new parameters will be in effect until you specify a different environment. To return to your normal environment, use .ev or .ev 0.
Listing 10.6 shows how you could use environment switching instead of writing the .Qb and .Qe macros.
.ev 1     \"long quote begins
.sp
.ls 1
.in +1i
.ll -2i
text of quotation
.sp
.ev
Environments are often used with diversions or with footnotes where the text is set in a smaller point size than body type. It is to accommodate diversions within diversions that the third environment is provided.
Debugging macros is a slow and often painful process. If you have a version of troff that includes a trace option, use it--but be warned: It produces miles of paper. If you do not have a trace option, you can use the .tm primitive (for terminal message) to print the value of a number register at certain points in your file. The value is sent to standard error, which is probably your screen. Use .tm like this:
.tm Before calling the Xx macro, the value of xX is \n(xX.
.Xx
.tm After calling the Xx macro, the value of xX is \n(xX.
You do not have hide the number register from copy mode because you put these lines right in your text file. You may want to delete these messages when the document is complete. The messages do not go to the printer but they can make your screen messy.
Sometimes you have to look at troff output--it is not a pretty sight, but after the first few files, it begins to make sense. The troff code produced by a file with two words in it: UNIX Unleashed is shown in Figure 10.4.
Figure 10.4.
troff Output for "UNIX Unleashed."
If you look hard, you can pick out the text in the long line. The numbers are horizontal motions reflecting the width of the letters. You can also see where the font positions are defined. The s10 on a line by itself is the point size. f1 is the font in position 1 (in this case, Times-Roman). The H and V numbers following the font definition specify the starting horizontal and vertical position on the page.
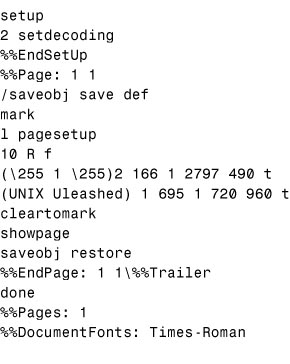
PostScript output is a little easier to read, but the set-up lines are endless. Where UNIX Unleashed generates 24 lines of troff code, the same two words generate more than 800 lines of PostScript code. The significant lines are at the beginning and the end. The last 17 lines of the PostScript produced by troff -Tpsc | psc of a file with two words in it: UNIX Unleashed is shown in Figure 10.5.
Figure 10.5.
troff -Tpsc | psc (Postscript) Output for "UNIX Unleashed".
Font and point size are specified as 10 R f (10 point Roman). Text is enclosed in parentheses (which makes it easy to find). The showpage is crucial. Every page in your document needs a showpage in the PostScript file. Occasionally, PostScript output is truncated and the last showpage is lost. No showpage means no printed page.
The following suggestions may be helpful. Most of them are very obvious, but, because many people have made all these mistakes at one time or another, they are included.
Starting from scratch is necessary if you intend to sell your macro package. If you just want to provide a nice format for your group, use ms or mm as a basis. Remove all the macros you do not need and add the ones you do need (lists from mm, if using ms; boxes from ms, if using mm). Do not reinvent the wheel. Copy, modify, and use as needed.
Make sure to include autoindexing and automatic generation of master and chapter Tables of Content.
Write a format script for your users to send their files to the printer, preferably one that will prompt for options if they are not given on the command line.
Write--and use--a test file that includes all the difficult macros you can think of (lists, tables, headers and footers, and so on).
Try to enlist one or two reliable friends to pre-test your package. You will never be able to anticipate all the weird things users do to macro packages. Start with a reasonable selection. Save lists within tables within diversions within lists for later. Do not replace your current macro package with the new one while people are working. Do it at night or after sufficient warning. Make sure the old macro package is accessible to your users (but not easily accessible, or they will not use your new one).
Do not use PostScript shading if most of your documents are photocopied rather than typeset. Copiers wreak havoc on shading. Also, there is always one person in your group who does not use a PostScript printer.
If you have created an entire macro package, you want it to be easy to use, and you want it to do everything your users could possible desire. This means that you should provide users with a format script. Although actual programs for these tools are beyond the scope of this chapter, the following hints should get you started:
To substitute your own macro package for the standard packages (ms, me, mm, or man), you have a choice of three methods:
All other options to nroff and troff can be used just as you use them for the standard macro packages. Remember that the -r option can be used only to initialize registers with one-character names.
This chapter has shown you how to develop macro packages by building on the primitives available within nroff and troff. Debugging can be difficult when looking at the final document, so you should take advantage of some of the examples in this chapter to learn how to read the output of troff.
Writing one or two macros can be fun and can greatly simplify your life. Start small and easy--no number registers defined by other number registers, no renaming, and, if you can manage it, no traps or diversions. Writing macros helps to understand macro processing, which can make you a more valuable employee.
Writing an entire macro package is a long, difficult process that can continue for months, even years, after you write that last macro, because someday some user will combine a couple of macros in ways you never dreamed of. Do not write a macro package unless you are prepared to maintain, provide documentation, support users, and modify it.
![]()
![]()
![]()
![]()
![]()
©Copyright,
Macmillan Computer Publishing. All rights reserved.